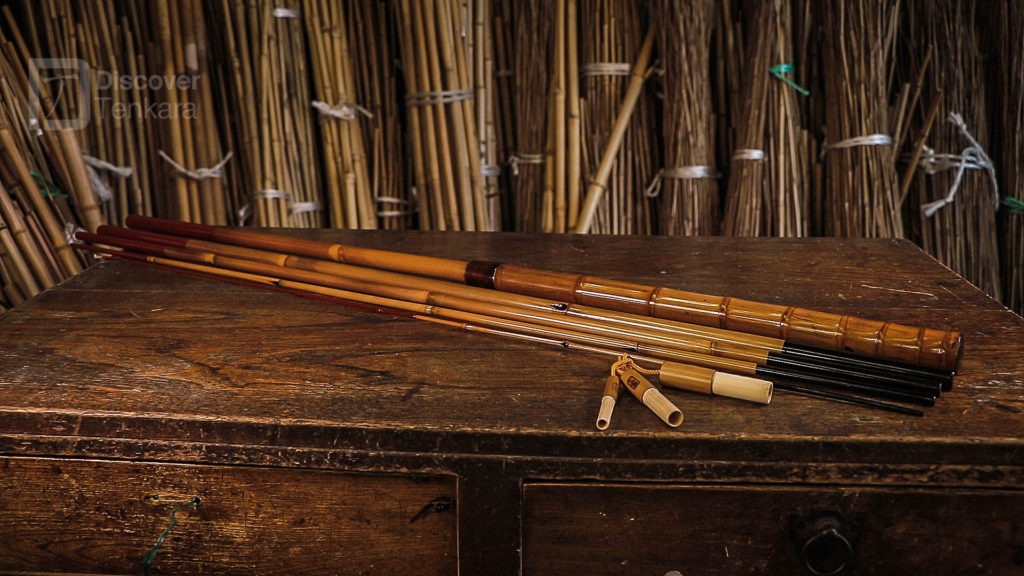
The two kinds of Bamboo tenkara rod
The original bamboo tenkara rod was a raw, functional tool – an honest and basic instrument. This is the noble, rustic tool used by the Shokuryoshi (professional tenkara anglers). Unadorned, raw bamboo rods are undeniably beautiful and magical – as many of my trip reports would show. Recently, though, the breathtaking beauty and artistry of lacquer decoration and finishes (reserved for fishing styles practiced by the highest-status Japanese anglers) is being extended to tenkara.
This is the great irony of the ancient “Edo wazao” tradition AND the ancient method of tenkara; that the collision of these two extremely old schools has only happened in the modern age. Basically, before tenkara was transformed from a method of survival into a technical pastime – tenkara anglers could not afford the great expense of wazao style lacquered rods.
When you hold an exquisitely-lacquered, bamboo Edo wazao it is no exaggeration to say you feel the soul of Japanese fishing resonating within it. These works of art are the traditional, whole (not split) cane rods made by an increasingly rare breed of master craftsmen known as the “wazao shokunin”. There’s more on shokunin later in this article – because grasping some of the scale of their dedication is absolutely central to the idea of Japanese bamboo fishing rods.
But I first want to talk about the rods themselves a bit more before getting to that.
Each rod is unique and must be created using the centuries-old disciplines of tempering and working bamboo along with the painstaking application of “Urushi” lacquer. Once the layers upon micro-thin layers of lacquer are built up over many weeks – you end up with a beautiful, glossy and perfectly balanced rod that shows the true beauty and perfect function of the natural materials. The plant-sap lacquer protects against moisture, physical damage and even acids – and by selecting just the right species and taper of each bamboo section, incredibly high performance rods can be made by a master craftsman…
Whatever your method and target species, it is possible to craft a truly one of a kind wazao that will create the most exquisite days of fishing you have ever experienced.
Masayuki Yamano is one of the few remaining master craftsmen known as “wazao shokunin”, and unlike many other creators of these stunning rods, he is happy to explain how each unique piece can be created just for you…Oh, and he has studied tenkara over recent years, so he can now include rods for that style of fly fishing into his impressive, extensive inventory of specialist wazao.
If you are impatient and want to skip ahead, I’ve included his explanation of the specific steps he uses to create his rods later in this article – but I would definitely say those details are much easier to understand if you know a few things first. Starting with the idea of Wazao.
Wazao 和竿
Sao is the Japanese word for fishing rod – putting “wa” in front of that word tells you that this is a traditional, hand-crafted rod (and changes the “sao” sound to “zao”). The word was probably invented to differentiate the traditional bamboo rods of Japan from the foreign “split cane” traditional rods that began to be imported to Japan during the Meiji era.
The major difference between these two rod-building schools lies in the western use of split-cane versus the whole, round stems (nodes and all) used to make Japanese wazao. Well, that and the amazing Urushi lacquer – toxic and highly irritant when it is being applied – yet beautiful, inert, incredibly tough and completely safe once cured and set.
On top of Isaac Tait’s great blog post explaining his own “diy bamboo tenkara rod” experience with Yamano-san, Adam Rieger has kindly written a detailed account below with pictures of his own, recent diy rod-building experience of a Yamano-wazao. Adam’s description and pictures of his experience are included later in this article with his kind permission.
But before we get to that, I still want to give you the benefit of understanding the process of building a bamboo tenkara rod in the wazao style. So, we need to understand a bit more about the notorious “Urushi” lacquer.
Urushi 漆
The active ingredient in Urushi lacquer is Urushiol – and this is just a sample of what Wikipedia has to say on this remarkable substance:
“Urushiol is an oily organic compound with allergic properties found in plants of the family Anacardiaceae, especially Toxicodendron spp. (e.g., poison oak, Lacquer Tree, poison ivy, poison sumac) and also in parts of the mango tree.
In most individuals, urushiol causes an allergic skin rash on contact, known as urushiol-induced contact dermatitis.
The name urushiol is derived from the Japanese word for the lacquer tree, Toxicodendron vernicifluum (漆 urushi). The oxidation and polymerization of urushiol in the tree’s sap in the presence of moisture allows it to form a hard lacquer, which is used to produce traditional Chinese, Korean and Japanese lacquerware.”
In short – this “dangerous-when-raw” wonder-substance not only preserves, waterproofs and reinforces a bamboo rod; it is also incredibly beautiful and even acid-resistant. Coloured mineral clays (red is common) or black ash are added to produce the decorative tones used in addition to the natural, transparent amber or toffee-coloured pure Urushi. You can check out Wikipedia to find out more about those lacquerware crafts and products.
Shokunin and the Craft of Bamboo Rod-making
Although it’s difficult to find a really satisfying and comprehensive definition of the idea of a Shokunin on the internet, one quote does crop up quite a lot, and it deserves to be repeated here:
“The Japanese word shokunin is defined by both Japanese and Japanese-English dictionaries as ‘craftsman’ or ‘artisan,’ but such a literal description does not fully express the deeper meaning. The Japanese apprentice is taught that shokunin means not only having technical skills, but also implies an attitude and social consciousness. … The shokunin has a social obligation to work his/her best for the general welfare of the people. This obligation is both spiritual and material, in that no matter what it is, the shokunin’s responsibility is to fulfill the requirement.” – Tasio Odate
But I also like the qualifier included in this short blog post which says “One of the essential things is to make something for the joy of making it, and to do it carefully, beautifully, and to your utmost best of your ability. In Japan one can see this in the incredible delicate designs, or amazing machinery, and even the pride and perfection of even the cleaning staff.”
The word “shoku” 職 means work, job or labour. “Nin” 人 means a person. Typical Japanese understatement in action right there!
For all the solid information above, it still doesn’t quite get to the heart of the matter the way that Go Ishii explained to me in his quote below:
In most traditional trades, it is often said it requires 10 years of training for one to be called a “shokunin”. Some shokunin are recognized and have been awarded the status of “living treasure” by the Japanese government to recognize their work and accomplishments.
Examples of how the word “shokunin” is used include:
- Sushi-shokunin: Sushi chefs of very high standards such as Jiro Ono of Sukiyabashi Jiro, made famous by the documentary film “Jiro Dreams of Sushi” would be called a sushi-shokunin.
- Wagashi-shokunin: Japanese traditional pastry chef
- Urushi-shokunin: Urushi lacquer craftsmen
- Wazao-shokunin: Traditional Japanese bamboo fishing rod builder
Before Japan’s industrial revolution, which occurred between late 1800’s through early 1900’s, shokunin were at the centre of Japan’s economy, along with farmers. Pushed by the great demand of samurai to possess high quality swords (katana), the Japanese had perfected the art of forging steel in the late 900’s. Strong and razor sharp steel blades were implemented in various tools used by shokunin of all trades.
For the next thousand years, Japan would be home to some of the world’s most impressive art and crafts.
Those shokunin who had mastered every secret of a craft, also took on the responsibility of creating successors who would pass on the knowledge and techniques. Shokunin often created a brand name, which would be used from generation to another. Maintaining quality and status was much more significant than keeping the trade in the same blood.
Today, shokunin are present in every corner of Japan’s society. Wood carving, gardening, paper crafting, stone carving, painting, wood block painting, glass carving, bamboo weaving, bamboo fishing rod building, urushi painting, furniture building, just to name a few disciplines.
There is a phrase used in Japan even today that describes the spirit of a shokunin; “shokunin katagi” – 職人気質. According to Daijisen, a famous Japanese dictionary, it means,
”To pursue perfection with discipline, never sacrifice quality of work for self-prosperity, and only produce products the producer can proud of”
Now we are getting somewhere.
Yamano-san’s “Wazao Shokunin” Bamboo Rod Building Process
In 2017 we had the pleasure and honour to be introduced to Masayuki Yamano by our mutual friend Go Ishii. Yamano-san very kindly and patiently took us through the fundamentals of his bamboo rod building process – which his family has been doing for three generations. Here are some of the top secrets of his craft that he shared (including the secrets involved in building a bamboo tenkara rod in the “wazao” style).
Collecting Bamboo
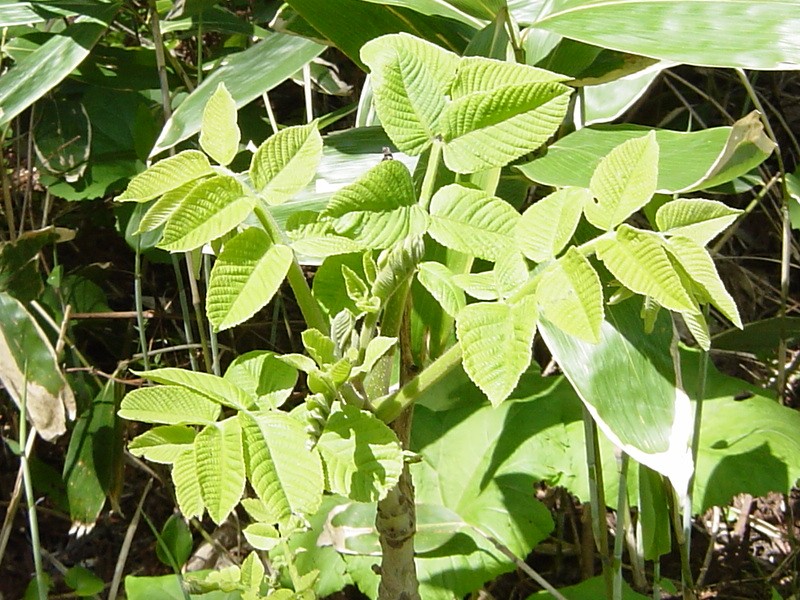
Bamboo for wazao is best harvested in winter. The dry winter air, dry soil, cold temperatures and dormant growth state of the bamboo makes the stems firmer (and probably more resistant to insect attack too). There are 8 main species of bamboo used to make fishing rods, each with specific characteristics that are matched to particular functions:
- Hotei-chiku 布袋竹
- Ha-chiku 淡竹
- Ya-dake 矢竹
- Marubushi-dake 丸節竹
- Suzu-take 篠竹
- Kuro-dake 黒竹
- Kan-chiku 寒竹
- Ma-dake 真竹
Initial preparation
The green bamboo is “branched” in the mountains – all the small side-branches are trimmed off the main stem or “culm” before being brought back to the shop. If necessary any papery outer skin of the stems is peeled off and the surface of each main culm may be polished using damp rice husks (a process known as “migaki”).
For most species and samples, it will be necessary to remove excess moisture and sap by an initial tempering over a gas flame or charcoal brazier. This initial tempering is called “abaranuki”. Gently heating the culm forces the oily sap out onto the surface of the bamboo stem where it can be wiped away with a cloth.
Sun bleaching, initial drying and then ageing
The bundles of culms are spread out to stand in the sun for several weeks until most of the green colour has disappeared (normally a two-week process – but perhaps up to three months where necessary). Then the canes are collected and placed into a dry storage facility for between 3 and 10 years (or longer). This painstaking step is vital if the bamboo cane is ever to achieve its maximum strength.
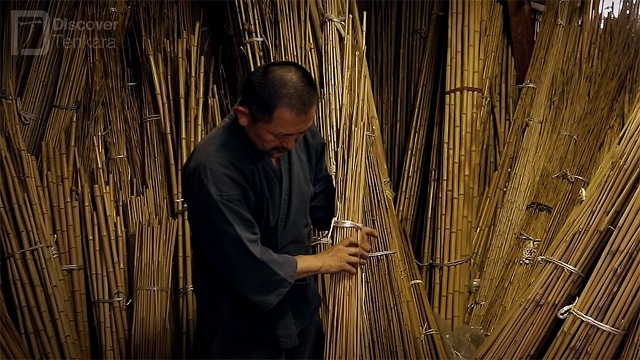
One major difference between excellent quality wazao and cheaper copies from other countries or lower-quality manufacturers is the ageing of the bamboo before any rod-building activity even begins.
A properly-aged culm is vastly lighter than one that is still holding onto residual moisture. It is also far more reliably straightened and likely to remain “true” after the shaping and tempering processes of wazao creation. The expense and patience required to wait for bamboo to completely lose that moisture by natural air-drying before being tempted to use the bamboo is a great differentiator in quality and price.
There is no way to speed up this process, since if it is done too rapidly, the strength, flexibility and also the ability to correctly straighten each culm will be lost.
Bamboo Tenkara Rod design
Because each type of fishing requires specific characteristics from a rod – from length, stiffness, flex-profile (how stiffness changes throughout the length of the rod), taper, weight, overall strength, balance and more – rod design is a highly skilled process. The basic steps are choosing the correct pieces to form each section of the rod and then cutting those sections to an approximate length (erring on the side of a bit too long – you can’t put it back on again later!). The key thing to realise here is that you cannot control overall taper by shaving or planning whole bamboo in the way that split-cane rods are tapered.
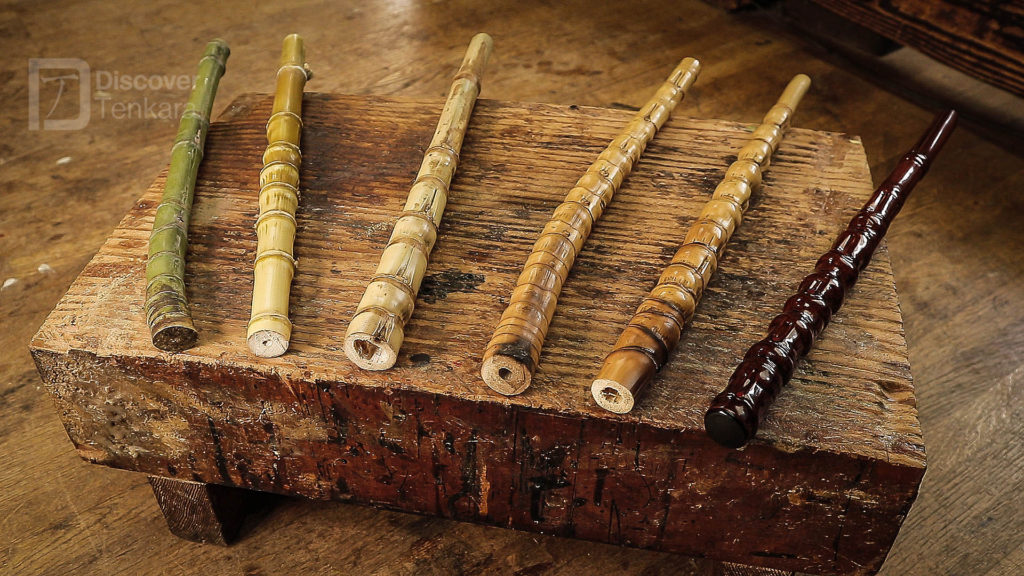
That selection process is known as “kiri-komi” and, for a five-piece rod there may well be five different species of bamboo used in that single rod (choices are based on the flexibility, distance between nodes, strength, taper/diameter and even aesthetic considerations).
Of course, you need to have in mind the end result that you want in terms of all those rod performance characteristics. You also need to know the properties of each of the main 8 species of bamboo AND be able to choose exactly the right individual pieces of correct length, taper and flex profile to make each section to meet the needs of your design.
This is further complicated by the fact that, even within each bamboo species, every stem is unique. It obviously takes great skill to select, adapt to and incorporate those individual differences to keep the design on track. You can now easily understand why each wazao is as unique as your fingerprint and why it is so special to own and fish with one by adapting your own character and skills to the character and qualities of your unique bamboo tenkara rod.
It becomes very personal.
Tempering and Straightening
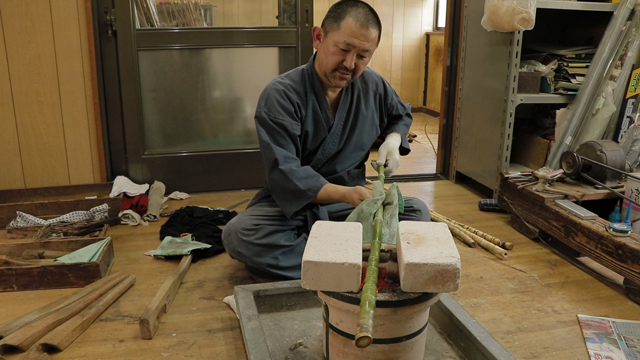
This process – known as “Hi-re” (pronounced a bit like “he ray”) is traditionally carried out over a charcoal brazier where the rod is passed over the heat in a narrow gap between heat-proof clay or brick sides. In bamboo arrow making for archery (Kyūdō) I have seen a complete, inverted dome of heat-proof clay placed over the hot coals (with an aperture to pass the bamboo stems in and out over the heat). Heating evenly like this – without scorching – makes the bamboo pliable and almost like warm plastic for a few seconds.
By holding a cloth and the correct size of wooden straightening tool (called a tamegi) in one hand, quickly drawing the culm out from the heat with the other hand allows a wazao shokunin to simultaneously wipe off any excess bamboo oil/sap with the cloth while also torqueing the culm with the angled slot of the tamegi. By repeatedly sighting along the culm, Yamano-san can identify any kinks and apply just the right amount of torque to correct and straighten each bend.
Being careful to avoid scorching (and so damaging the mechanical strength of the bamboo fibres), the culm is slid backwards and forwards through the groove in the tamegi (a bit like the “rest” that snooker players use for cuing up long shots) into and out of the heat. Rotating and sliding back and forth allows the heat to be evenly applied. Then quickly drawing out gives a wazao shokunin just a few seconds for each adjustment to be made before the culm cools and becomes rigid again.
With insufficient or incorrect ageing, this straightening process would need to be repeated over and over again before the corrections would become permanently “set”. Once straightened to perfection, each section can be cut precisely to length ready for the next step.
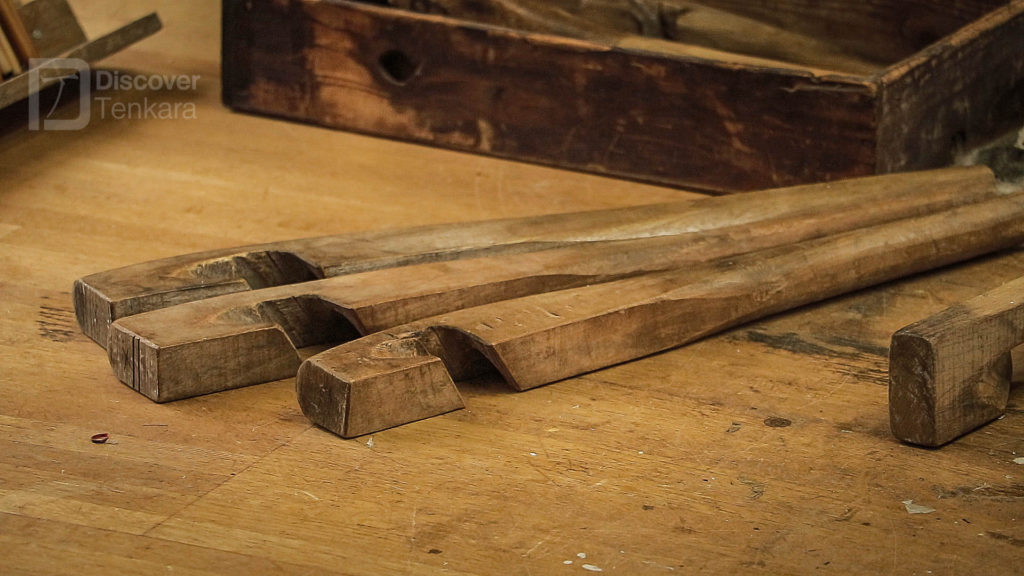
Creating the female joints: Part 1
Starting with the female joint – known as “kuchi” (which is Japanese for “mouth”) – the outer surface of the joint area is shaved slightly with a sharp blade to make a surface that has good grip. Onto that slightly roughened/grippy surface, thread wraps are applied to reinforce the area that will be hollowed out to create the female joint. Shaving is known as “kezuri” and the action of wrapping material or thread around an object is called “ito-maki; literally “material-winding/wrapping”. You might recognise “maki” from shikake maki (tenkara line winders) or maki-mono (what sushi rolls are usually advertised as on western menus – usually called maki-sushi in Japan).
Then, urushi lacquer is applied to the thread wraps to cement them and provide real strength. The brushes that are used to apply urushi are a flat, wooden spatula shape with holes drilled to accept bundles of bristles. The brushes are known as Urushi Hake (うるし刷毛) and the “ke” (hair/fur/feather) is the same as the character in “kebari” (“feather/fur-hook” or fishing fly).
In the case of a wazao shokunin’s “urushi hake”, that “hair” (for the brush bristles) is actually human hair. To be specific, the highest quality brushes are made from the hair of Japanese women in their 40’s – since that is known to have the absolutely perfect characteristics. Yes, it gets that specific when it comes to Japanese crafts and shokunin.
To apply the urushi lacquer to the whippings, a quantity is daubed onto a palette. Then a stripe of lacquer is deftly spread lengthways along the whippings. Finally, the culm is rotated while the flat edge of the brush is held still at the perfect angle and with perfectly even pressure to draw the lacquer uniformly over (and into) the thread whippings around the full circumference of the rod joint.
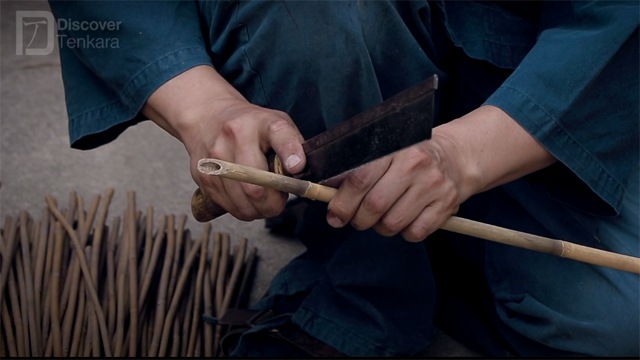
Creating the male joint in a bamboo tenkara rod
Each male joint (“komi”) is created by shaving a precise taper into the narrow end of each rod section. The “kezuri” shaving is carried out using an incredibly sharp knife, held at 90 degrees to the surface and pushing down along the culm (raising a “curl” of bamboo just like shaving parmesan cheese). The culm is then turned a few degrees and the next curl is shaved. By continuing this rotate-shave, rotate-shave, rotate-shave sequence a precisely-controlled, blunt-ended cone-shape is created. This is the male joint.
Creating the female joint: Part 2
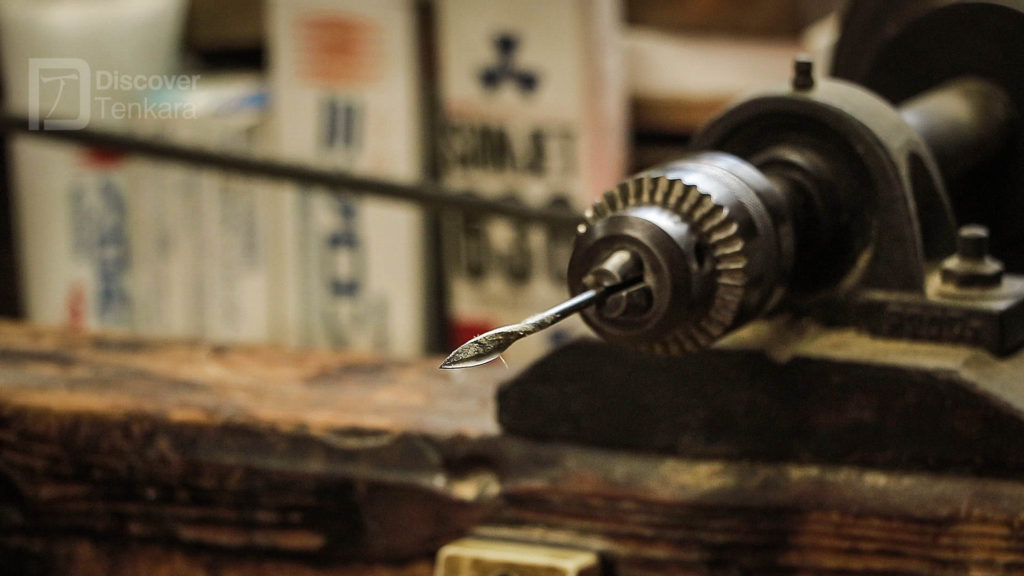
The whole process of male and female joint creation is referred to as “tsunagi”. The final part of this is to gradually hollow out the “kuchi” (female joint). This cannot be done too aggressively, since the culm is very easy to split. It also requires specialist, hand-made tools called “yanagi-ba” – the “willow-leaf” drills with the spear-like blades.
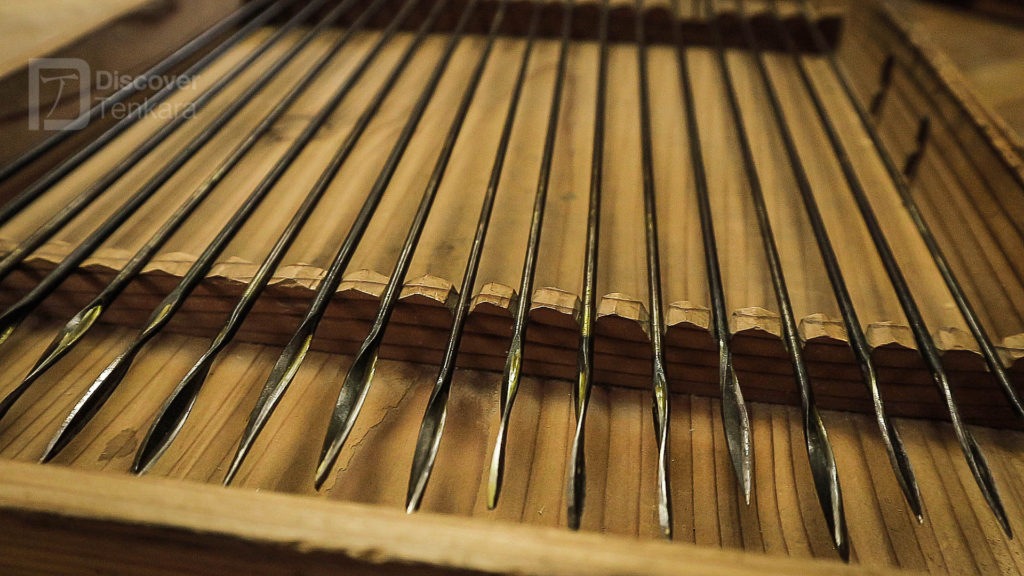
These are beautiful, slightly spiralled and wickedly sharp drill-bits. They are made in sets that increase by TINY fractions of diameter between each drill bit. This means that a very precise fit of the hollowed-out kuchi can be made to the gently-tapered komi male joint by starting with the smallest appropriate yanagi-ba and then working up, one size at a time. The tiny increases in size throughout the set of yanagi ba also avoids the risk of splitting or cracking the culm.
Final components
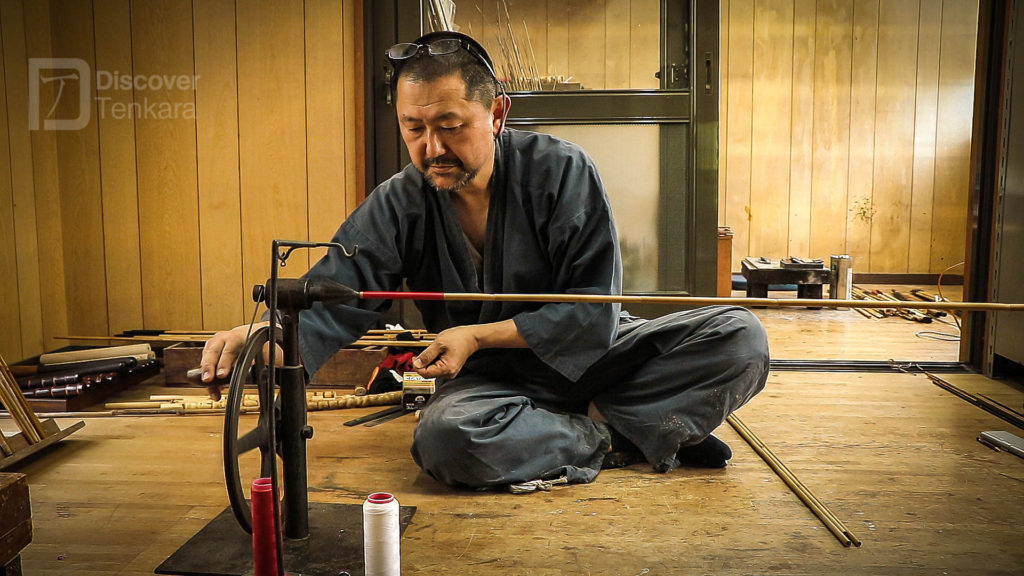
Two last pieces are added to each rod. The first is the “lillian” cord which is fitted to the tip of the rod and whipped in place before being secured by lacquer. Kevin Kelleher and Misako Ishimura wrote in their book that “lillian” is a corruption of “lily-yarn”, a hollow-core woven cord that was patented in Kyoto in 1923. It is thought that the method of laying out the strands as they are woven on the jig to create that cord makes a shape that resembles a lily – so that makes a natural name for the yarn that emerges from that jig.
The very last component is the handle or grip (nigiri). Many westerners love the “hotei-chiku” root handles for their own bamboo tenkara rod (and some of their graphite tenkara rods too). This is a major use of that species of bamboo mentioned earlier in this article – and it also appears in wazao made for a range of other species and methods too. Hotei-chiku roots are very highly featured and ridged – with nodes that are extremely close together. This is why those sections lend themselves well to making the handles of rods. They look incredibly beautiful when lacquered too.
However, for many of the real bamboo tenkara rod connoisseurs in Japan, their very favourite grip material is tung wood. It provides a lovely textured grip and an ideal balance to tenkara wazao. Perhaps there is some kind of invisible cosmic connections in action within the bamboo rod-building art – but I find it really interesting that tung oil is favoured as a finish by some of the most patient of western split-cane rod makers.
Tung oil needs to be wiped on as a fine coat, allowed to dry and then buffed with wire wool between each successive coat. So, while urushi lacquer replaces tung oil for the finish on wazao makers’ rods, the tung wood has excellent qualities for a bamboo tenkara rod handle.
For the wazao-maker, though, the lacquer finish is the crowning glory of that whole bamboo rod.
Finishing and decorating wazao
To complete the rod, urushi will be applied in multiple layers. For the finish, the natural amber/toffee urushi lacquer is applied along the rod sections by hand (without a brush) before being wiped down with a cloth and then set to cure.
The very best urushi is collected by hand in Japan – which is an awful job (often causing the collector’s hands to go black and their eyes to puff almost completely shut while the raw sap is “brewed” into functional lacquer). According to this article there are now as few as five or six people in the whole of Japan who are still prepared to do this job. The trunk of the urushi tree is slashed multiple times and, as the sap runs out, it collected in a bucket. This scarcity of supply now makes Japanese urushi lacquer extremely expensive.
Urushi has been used in Japan since ancient times to add decoration, bring out the beauty of natural materials, to strengthen and to waterproof goods and artifacts. Coloured urushi (most commonly red or black) is used to accent the joints of wazao. Sometimes shavings of mother of pearl from the inside of seashells is used as a pearlescent glitter by embedding it under coats of transparent lacquer over a base of coloured urushi. Other times, tallow may be rubbed onto the rod to create a mottled pattern when gold-leaf and/or coloured urushi is applied (only allowing the colour to bind and show through in certain places before wiping away the tallow and adding further coats of finish).
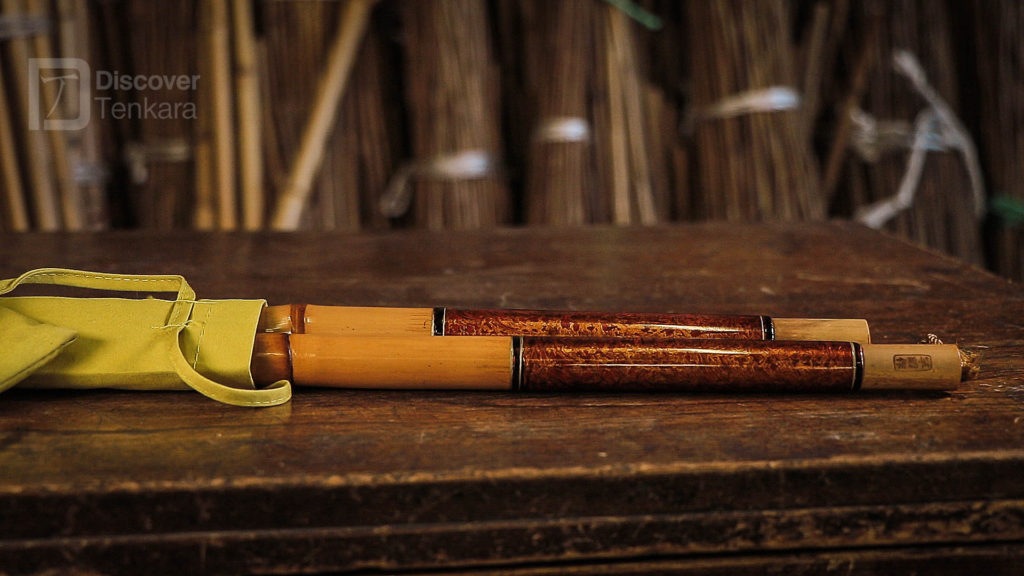
For the overall finish, a minimum of 10 coats of transparent urushi are added. Urushi requires some atmospheric moisture in order to cure – so the curing cupboard of wazao shokunin will usually be periodically given a few blasts from a water spray bottle. Each urushi coat needs at least two to three days to cure. So the very shortest time that a rod can be finished is one month (assuming 10 coats minimum). The more coats that are added, the deeper the toffee-coloured tones become – and there is always a high degree of judgement needed to ensure that the natural beauty of the underlying bamboo is brought out; but balance and restraint are important. Knowing how not to overpower or over-work the features and character of each stem of bamboo is a crucial skill.
Then, all that is left is to carry out a final straightening of the completed, lacquered rod (if needed) and perhaps to have the brand of the rod-maker burned onto the rod as an authentic identifier.
I hope that this fairly intensive crash-course and info will act as a useful primer so that you can really appreciate Adam’s account of his recent bamboo tenkara rod building experience with Yamano-san.
Adam Rieger’s Wazao Bamboo Tenkara Rod Build with Yamano-san
The third and final instalment of Adam’s excellent travel diary series…rod making with a master Wazao craftsman! Take it away Adam (you can see video of Adam’s experience in this issue of Tenkara Angler):
I love making things on my own…one of the things that really got me more into fly fishing was tying my own flies and the pleasure of actually catching a fish on a fly I made. I later got into making my own tamos, then horse hair lines…and well here we are…
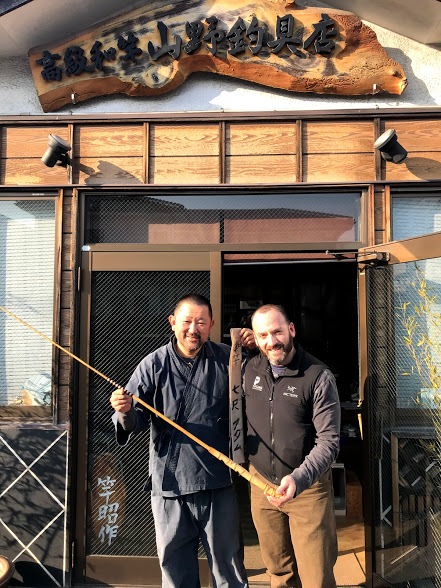
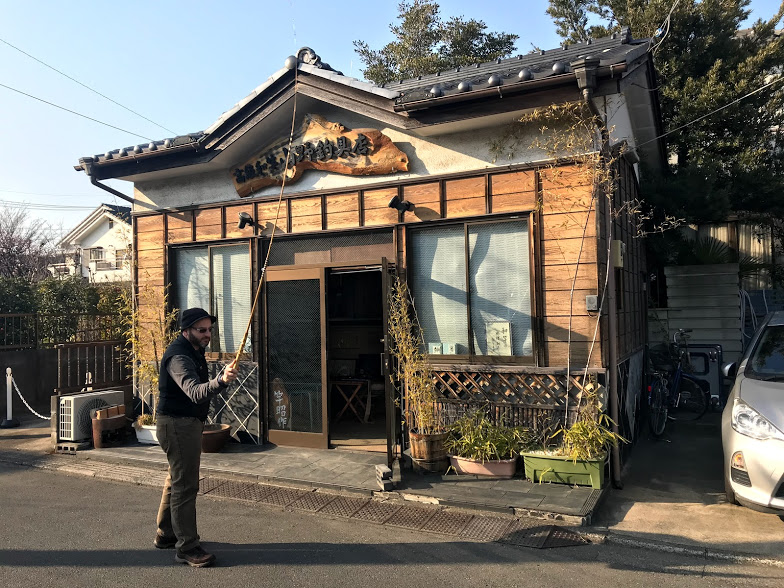
When I first found out I was going to Japan for work, I of course thought about fishing, but on learning that the trip would be in February, I began to investigate other options for my “tenkara” passion. My first thought was to try and visit the Mankyu shop/factory where the famous and beautiful tamos are made…but sadly he had passed away and the next generation was not continuing the business. I found that out with the help of Go Ishii who contacted them to see about the possibility. When the obvious answer was “no” he suggested I meet his friend Masayuki Yamano who is a master bamboo rod builder in the wazao tradition. I happily accepted!
Yamano-san’s craft, much like Mankyu’s tamo knowledge faces the threat of going away…this deeply saddens me. The skill and knowledge of these master craftsman are slowly losing business and also losing the generational interest required to keep the knowledge passed down. A true wazao craftsman like Yamano-san posses deep knowledge of bamboo wood, the different species, flexes and how to work it. Much of that is touch and feel! The art of “urushi” painting of the final products is a whole other level too! For those that don’t know, urushi laquer is dangerous stuff and it causes toxic allergic skin reactions to those who touch it. To be an urushi craftsman you have to build up years and years of tolerance to the toxins by slow gentle exposure over a long time. Yamano himself began his exposure when he was very young. Fake urushi exists…but like many things “faked” it is no equal to the real thing. Add to this the specialty tools used and countless other facets of the process that I did not experience and you have the make of a true “master”…that is Yamano-san.
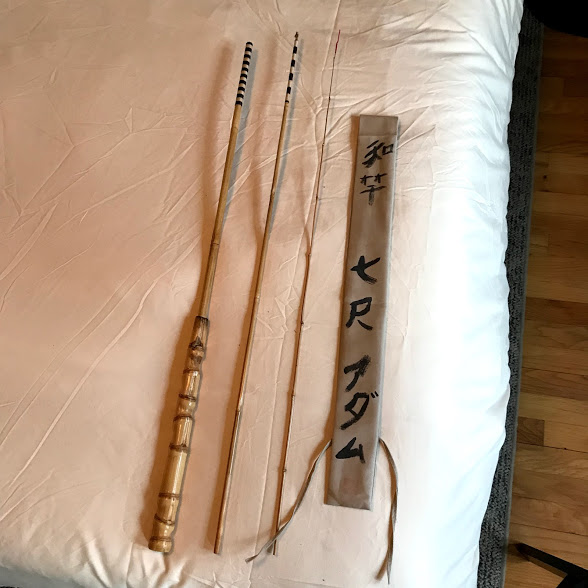
So for my day with Yamano-san, we decided to make a simple 3 piece, whole cane bamboo tenkara rod that was about 7 feet long…210cm zone. Go Ishii was my translator and guide for the process and he, through his friendship with Yamano-san, has added to this master’s knowledge of high level tenkara fishing…after all we cannot all be great at everything right? Go-san can cast the rods Yamano makes and offer feedback only a master caster can offer, so with the two men combined the world has something extremely special!
It is important to note that this rod build is VERY intro level…it is but a brief and small window into the process and geared towards fun and learning rather than making a masterpiece. This rod by no means at all comes close to a real finished product from Yamano-san himself…just want to be clear about that! To see what that is all about…you can visit Yamano’s website here…https://saosyosaku.com/
Let’s begin.
Step 1 – Selecting the bamboo pieces and cut to size. This was done for me in advance by Yamano-san. Even for a very simple rod this part takes a lot of skill and experience I love the outcome of his choices.
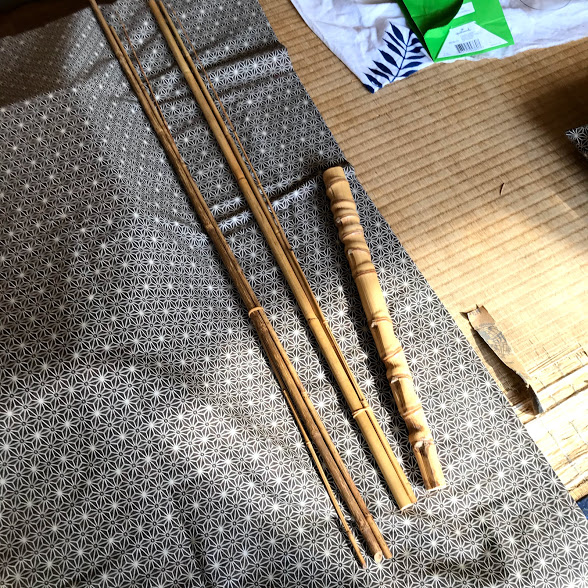
Step 2 – Cleaning the outside of the bamboo and smoothing out the rough parts and any “stick outs”
We began by sanding the outside of the sections just to remove any rough parts.
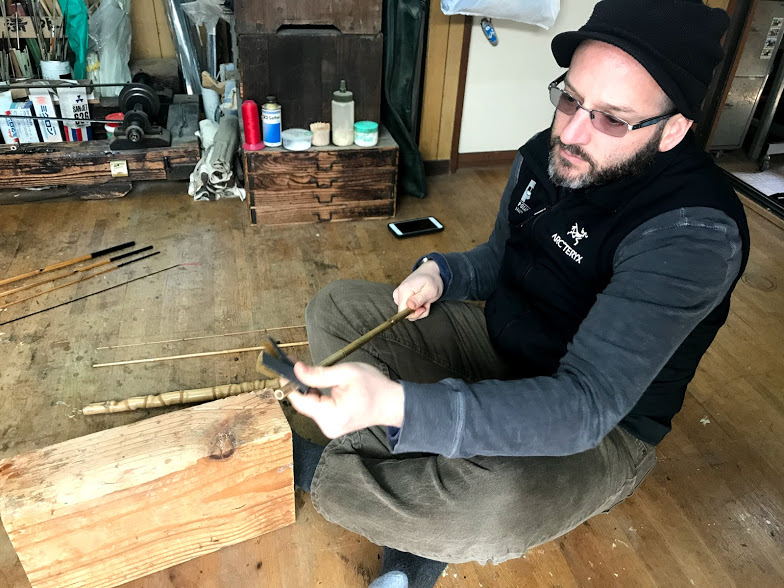
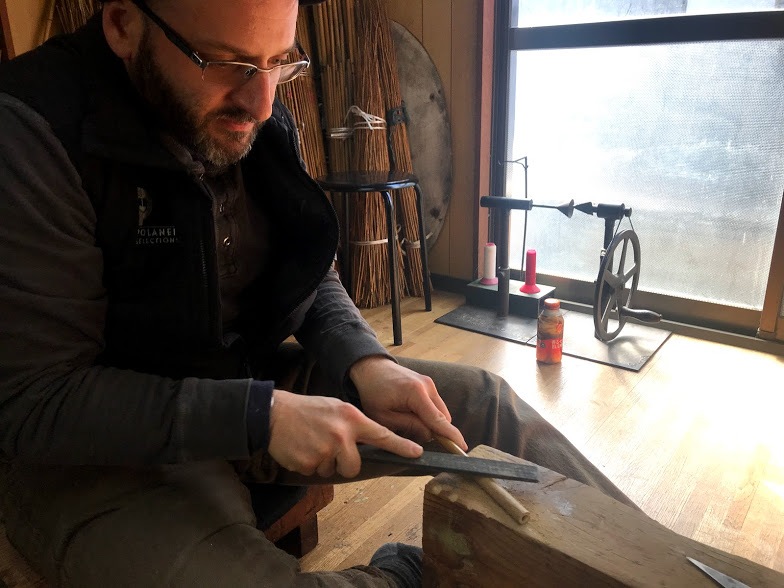
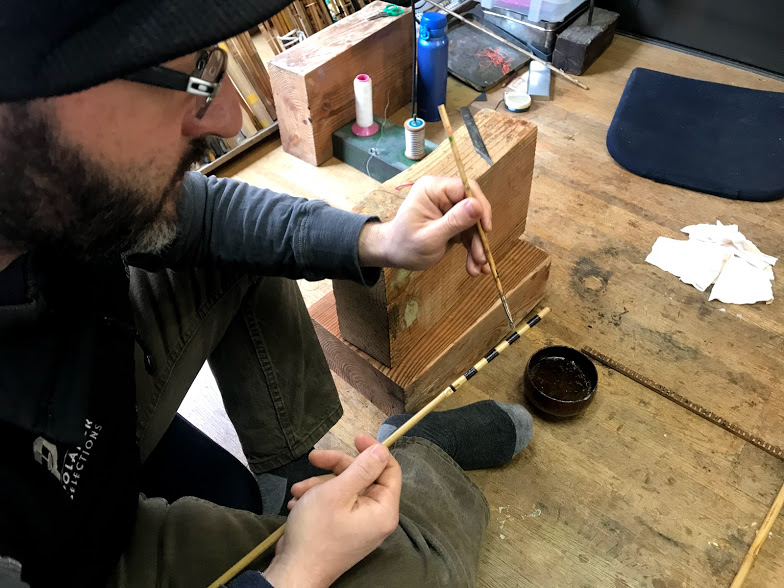
Step 3 – The joining of the sections was going to be a “male to female” joint. Each end of the joint was to be about 10 cm long. We measured and marked those lengths on each section. In those areas that will be the female side of the joint you then take a sharp blade and gently scrape off the very outside skin on the bamboo to “rough” it up.
Step 4 – The female joints are going to be hollowed out and widened by drilling. This thins the wall of the bamboo and could lead to it cracking. So before doing that the area is reinforced with thread wraps.

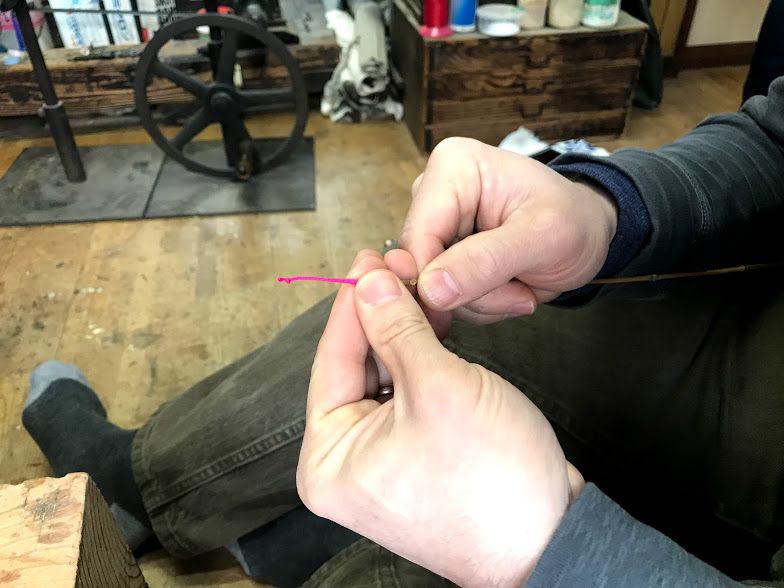
Step 5 – Attaching the lilian. I was told the name lilian comes from the use of a craft yarn called “lily yarn”…not sure what that craft is…but there you go :). The lily yarn is hollow, so you sand or carve the tip section thin enough to fit into the yarn snuggly. You then thread wrap over the part on the bamboo to secure.
Step 6 – Varnishing. You seal the thread wraps over the female joints and on the lilian wraps with a varnish…brushed on to soak in. The remainder of the bamboo gets a light coat of varnish wiped over it smoothly with a cloth.
Step 7 – Eat a big bowl of ramen and drink Asahi while it all dries 🙂 Thank you Yamano!
Step 8 – Make the male joints. To make the male joints you need to “reverse: the natural taper of the bamboo. To do this you file the outside more at the edge and less as you go into the section. I would do this and hand the section to Yamano-san who would close his eyes…feel the area…mark spots with a pencil that I was to file away. No measuring tools needed he can “feel it”!
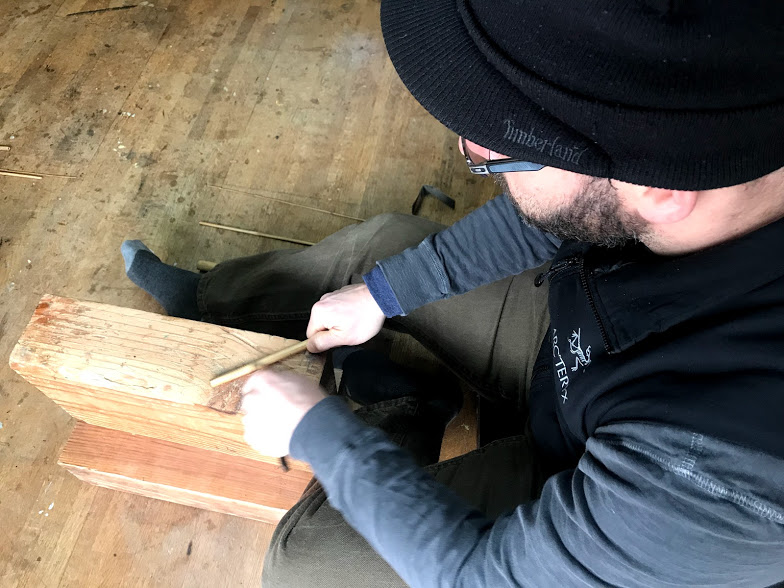
Shaping the male joint
Step 9 – Fully hollow out the sections. Bamboo is almost completely hollow…but at branch or leaf joints it is solid…so you need a very long drill to get in there and cut away those parts. I ended up doing this for the handle, and bottom two sections…the tip section remains solid.
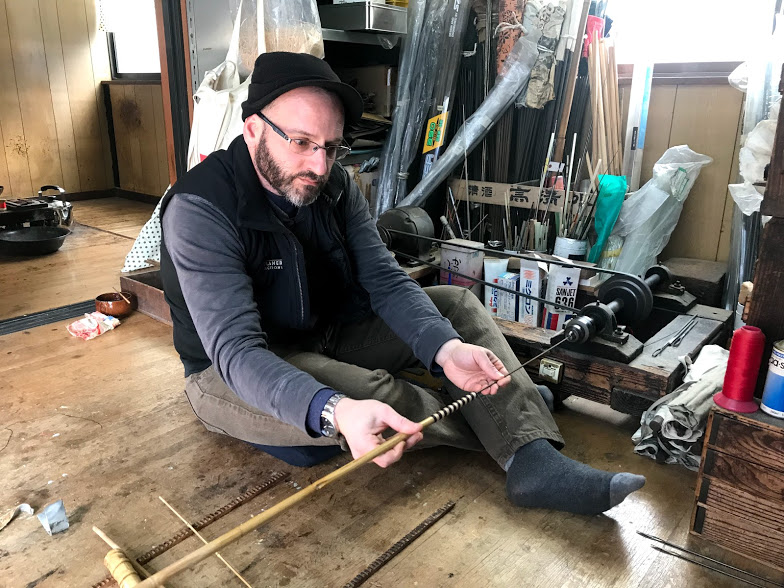
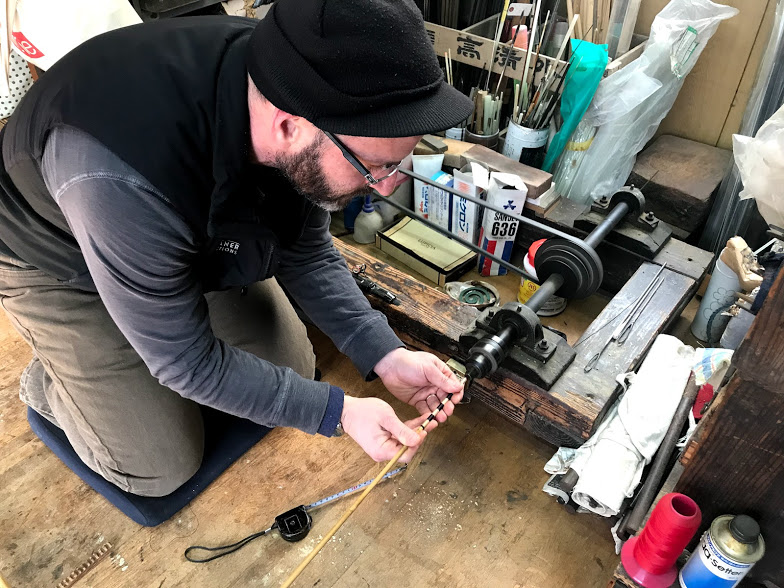
Step 10 – Hollow out the female joints. You set the drill at 10 cm depth and very gradually remove material to widen the hole so the male joint fits snug. As you get close…you can using a cool file tool remove a very tiny amount of material inside the female joint or you can sand, file or scrap the male side to very gradually make it all fit snug but not too snug.
Step 11 – hollow out handle and glue it onto last section.
Step 12 – assemble, cast and enjoy!
A rod like this is stiffer than most carbon fiber rods. It casts a heavier line better. We used a 4.5 size level line which worked great. I am sure a furled or twisted line would be even better. I will be working out some tapers for horse hair lines to use with the rod come spring.
If something like this or learning more is of interest to you please chime in, comment or share. As I mentioned in the beginning…this craft is in danger of being lost and I would like word of Yamano-san’s shop to spread around the world. It would be great if others could visit him or he could travel to do workshops and lessons around the world! If you know of western rod builders that would be interested please share this with them as well.
John and Paul, thank you for letting me share my experiences here with others. I love what you do and am very thankful that you and this resource you have built exist!
Adam – huge thanks from both me and John for allowing us to share your wonderful words and pictures. And now, to take things down several notches to my own bumbling experiments with rod-building…I’ve found a short blast from the past to finish off by reinforcing the personal nature of a bamboo rod.
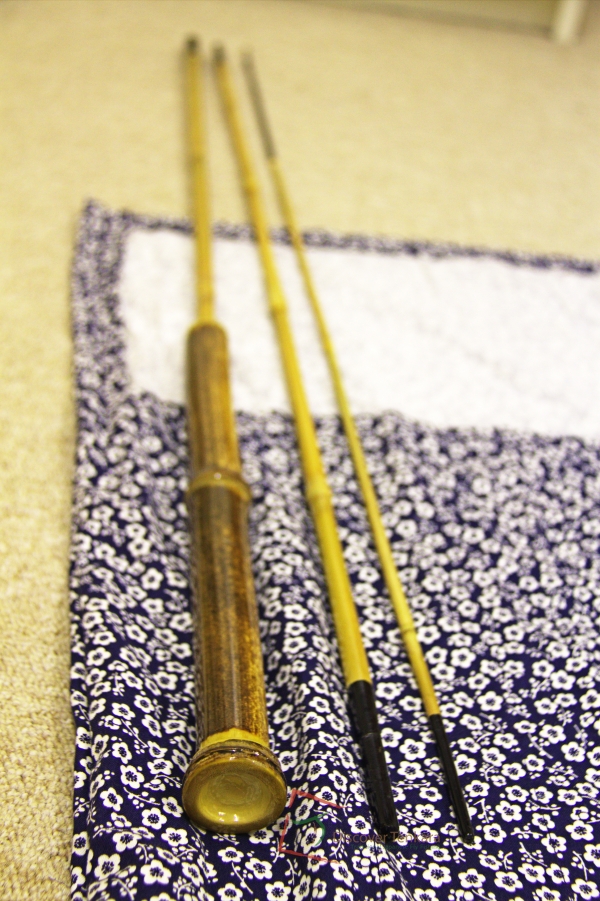
My own first DIY bamboo tenkara rod
Here are the words – complete with the original photos – from my October 2014 blog post from our old website (before it was hacked and we had to rebuild a new site from scratch). I certainly can’t put my efforts anywhere near the works of art produced by Yamano-san (or even by his students under his supervision). Even so, I really enjoyed my amateurish efforts being rewarded with the satisfaction of catching fish on my own rod and my own hand-made horsehair line. Re-reading this short blog entry after several years is also a heartwarming experience. Particularly because I know that I’ve lost not an ounce of my passion for tenkara in that time – despite multiple challenges and changes in our business…
So after a couple of months working most days (well, late nights actually!) on an experiment to see if it was possible for me to learn to make a functional tenkara rod from bamboo – I now have a rod that is at a stage that it can be fished with.
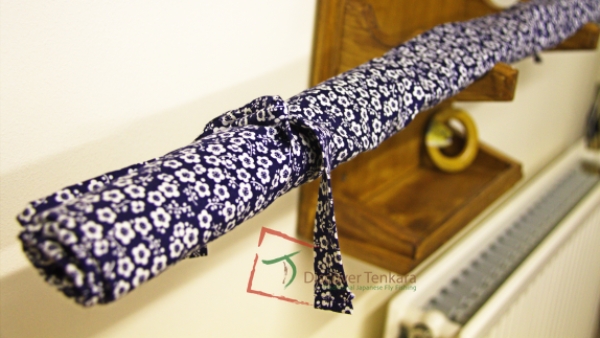
Plus, after some sewing machine lessons from my girlfriend last night (thanks Jo!), I’ve managed to knock up a rod bag for it too using some Japanese fabric that I found online from a UK importer.
Neither rod bag nor rod are perfect, but that doesn’t matter to me. I’ve had a great time learning about working with materials in a way that is totally new to me and it is really satisfying to have a functional product that I can enjoy catching fish with at the end of that process. It has also taught me much more about rods and rod-action and casting in general; in a way that I probably wouldn’t have learned otherwise. As such it has given me a greater appreciation of the fabulous rods – both graphite and bamboo – that we are fortunate to have available to us. Now, there is a big difference between a genuinely “traditional tenkara rod” (which was anything but ornamental; they would have been purely functional since catching fish for survival would not bring in anything like the kind of wages needed to buy a beautiful lacquered model!)
I have especially enjoyed using a home-made horse-hair furled line and silk-eyed kebari (fly) tied on a sewing needle that I shaped and sharpened myself – just to see if I could!. This is real return to childhood stuff and it does provide both improved skills for applying when returning to fishing with fantastic modern materials – as well as a greater appreciation for those modern materials. I found that it is also an excellent “sheet anchor” that provides a useful reference point for what characteristics should be highlighted and preserved in modern tenkara tackle (so that it really has the “feel of tenkara”).
I hope you like the couple of pictures I snapped last night and maybe feel like trying something similar yourself? Trust me, if I can do it (with my utterly unimpressive DIY/woodworking track-record!) then anyone can make something that they can have fun with.
So there you have it, a hopefully useful and detailed introduction to the fascinating craft of whole bamboo rod making as well as the true art of the wazao shokunin.
Paul
PS you can show your excellent taste (!) to your friends by clicking your favourite handy-dandy social share buttons on this page.