Akiyamago kebari on Tenkara in Focus
If you break down the word “Akiyamago” you get Aki (Fall/Autumn), Yama (mountain), Go (generic settlements in this case) – or “Autumn Mountain Settlement” in Japanese. It is a scattered group of dwellings that dot the flanks of Mount Naeba on the border of Nagano and Niigata prefectures. The settlement and the famous Akiyamago Kebari is the subject of the latest episode of “Kebari in Focus” (scroll down to watch the episode for free now)…
Discovering Akiyamago
The first time that either of us saw the name was on Yoshikazu Fujioka’s website – and a kebari (fly) pattern from this area really caught our eye. We used a version of it in our first ever tenkara DVD to demonstrate basic techniques of fishing on the surface. Even though they are wet flies, these patterns do actually make excellent dry flies until you pluck up the courage to fish them wet!
As you’ll see in the information below the video, a number of different traditional patterns have been developed in the settlements in the shadow of Mount Naeba – some that are similar to each other and others that are really very different…
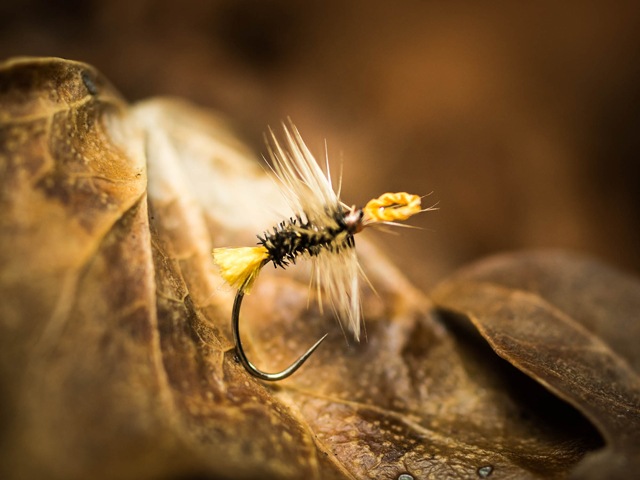
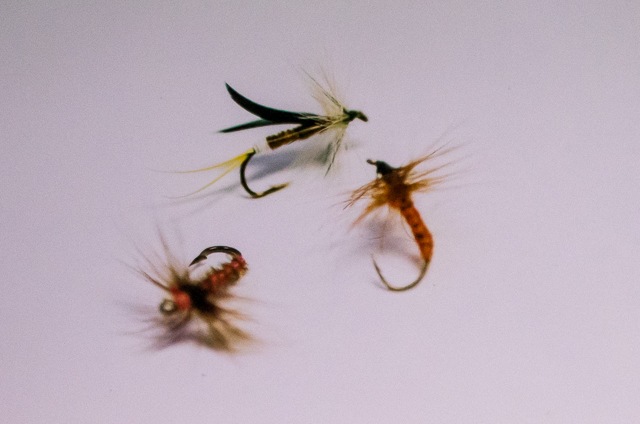
In this episode of Kebari in Focus, John ties one variant that combines features from a couple of those variations. He uses the stiff “furnace” hackle and body of peacock herl that Kazuyuki Yamada uses for his kebari. At the same time, the loop eye and tag are made from yellow silk (like some of those on Fujioka-san’s site) – rather than the white backing line that Yamada san now favours for its greater stiffness!
Although, Kazuyuki Yamada uses a peacock herl body – because it is easy for him to buy these days – it is interesting how his father Shigeo Yamada tied a distinctive body by clipping down the hackle. This method of tying produces a surprisingly similar appearance to peacock herl – especially with glossy hackles.
In Japan, hackles with a dark centre and pale tips to the barbs are known as “Shingoro” (such as the “furnace” and “badger” hackles we know in the West) – and these really do make excellent hackles and bodies when clipped.
Originator of the most famous Akiyamago Kebari (Shigeo Yamada)
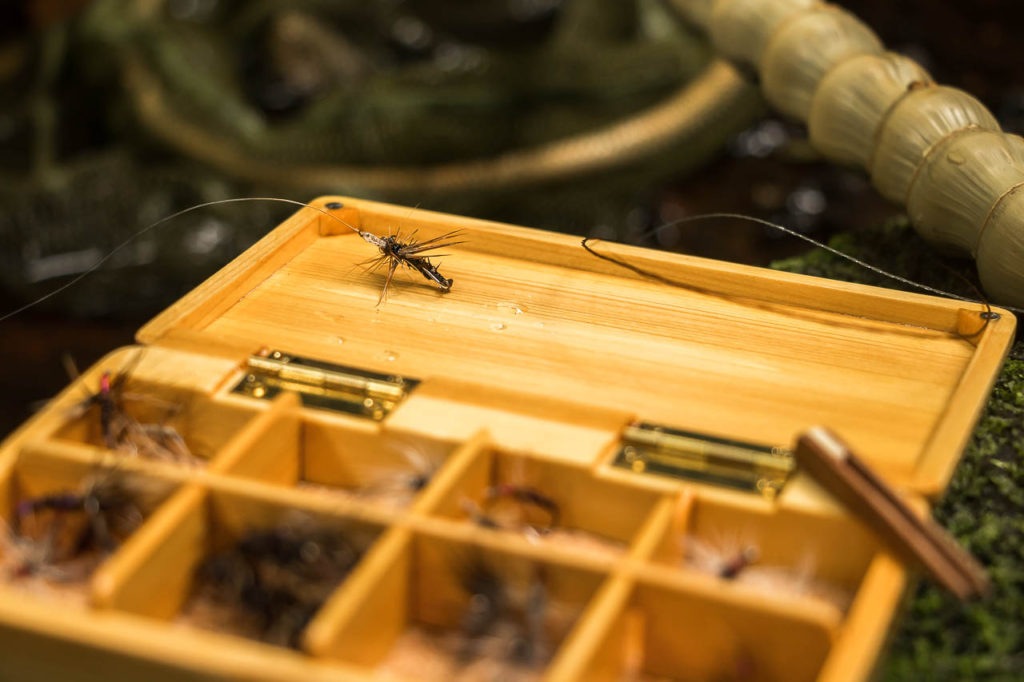
Shigeo Yamada was one of the most renowned Shokuryoshi (professional tenkara anglers) and bear hunters in the Matagi tradition of Akiyamago. He showed his son, Kazuyuki how to tie flies and you can easily see the resemblance between their patterns. The main differences are the inventive, but more time-consuming, clipped hackle body and also the use of a tightly-rolled paper “straw” to keep the silk loop eye from closing.
That straw can also be an aid when tying in the hand (rather than having the luxury of a vice as John shows in this episode of Kebari in Focus).
Because Kazuyuki uses stiffer material (fly line backing) it is easier to maintain an open “eye” without the use of a straw. However, Shigeo favoured the “straw” method and some current tyers (like Kenzo Hayashi, as reported on Fujioka-san’s website) also keep up that traditional use of paper straw and clipped hackle.
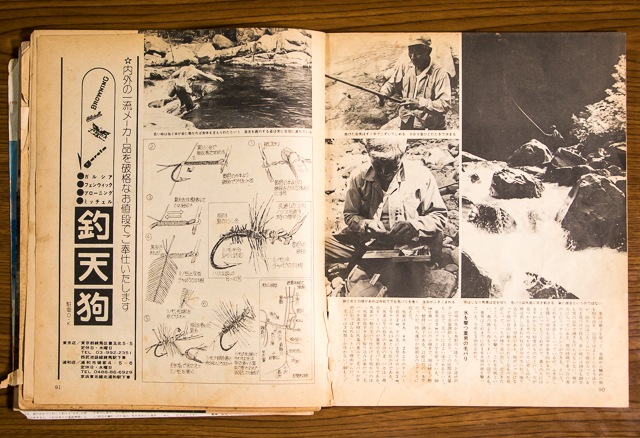
You can see some hand-drawn step by step instructions of Shigeo Yamada’s tying method (notice the “straw” with the silk loop eye cinched tightly around it at the head of the fly) in the third photograph below…
Although not identified in the description, I do wonder whether the tyer in the rare video that Nymphing & Tenkara Email Tutorial subscribers get to see right after the dry fly lessons might be Hayashi san…
These similarities of course make it all the more fascinating to see other radically different “family lines” of Akiyamago patterns.
When we first started using these clipped hackle flies with either red or yellow cord loop eyes (so similar to traditional English grayling flies), we could never have imagined that one day we’d sit down with Kazayuki Yamada in his family guest house in Akiyamago itself.
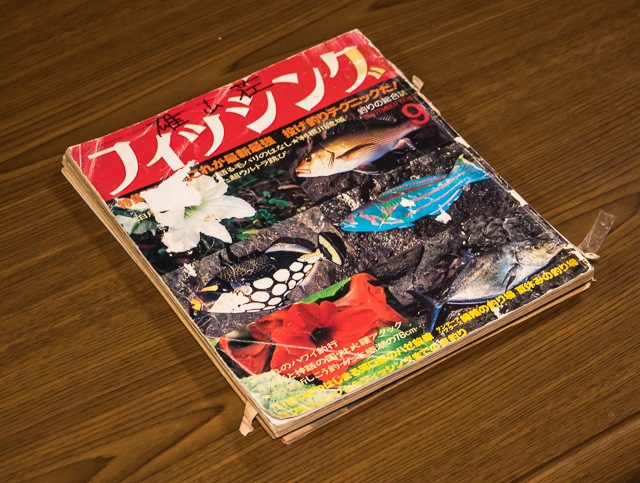
Much less would we have ever imagined him demonstrating his kebari for us and also showing us copies of the 1970’s fishing magazine featuring his father. As part of our time staying at Yuzanso (the family inn).
There are many more Akiyamago Kebari patterns than Shigeo and Kazuyuki’s Versions
It was during one of those conversations that Yamada-san told us how, in 2003 a photographer had visited Akiyamago with the mission to try to uncover and record all of the fly patterns of the valley. We were incredibly lucky and honoured to be able to examine the full album of photographic records that were made as part of this project.
Here is an example of what was found:
We hope that you’ve enjoyed both the Episode which we’ll now add to the Kebari in Focus library – but also the extra blog details that give more background to the kebari patterns of Akiyamago.
If you have enjoyed this information, please do check out our Patreon page that we set up in response to our recent setback (there’s a short back-story explanation video on the page) and we’d love for you to join the TiF TRiBE of patrons. If just half of our Youtube Channel subscribers opted into the “silver” tier, we’d easily smash our target that would allow us multiple new episodes and broadcasts each week. The same number opting in at the “bronze” tier would guarantee several broadcasts per month.
Paul and JP (please take a second to click and share!)

Very nice tied! On the picture on top of this post you show us a kebari with cutted hacklefibres? JP has tied the pattern by using peacock-herl. Is this a more easy variant of this?
Hi Eberhard, in the blog post text I explain that Shigeo Yamada used the cut hackle style body.
Now his son Kazuyuki ties with peacock herl. This is probably because it is easier to buy peacock herl now. It is also a little quicker to tie (and it does have a nice shiny effect too).
Best wishes
Paul
Thanks Paul, As you can imagine, my English isn’t as good as I need to understand all the sequences… Make it short – I have overlooked your hint into your blog. I’m sorry for that. I like it reading your informations and looking your clips a lot.
Eberhard
No worries at all Eberhard! I just didn’t want you to miss out on the nice piece of information.:)
Paul
Thank you for another awesome video! I’ll have to start pulling the materials for that kebari together. Lately, I have been fishing mostly weighted kebari due to the temperatures here in Utah. I consistently struggle with trying to tie the bead in without building up too much thread (~6/0 or 70 denier), creating a small gap behind the bead. I know that the fish don’t care about it, even still, I’d like it to appear a little more natural to my eye. Any advice on how to tie the bead in with less bulk? I know using lead, or lead-free wire can help, but I’m trying to avoid that.
Thanks,
Alex
Alex please email me a couple of pictures (phone camera is fine) of your weighted flies. Finished fly and at the point that you’re getting too much build up and I will give some tips. Addy is paulgaskellflyfishing@gmail.com
Ganbatte!
Paul
In Finland we have small but enthusiastic Tenkara practitioner community, and it seems to me that most of us has read your books and watched your earlier videos.
So thank you for keeping up and providing us much wanted information about Tenkara and giving us something to discuss about.
Unfortunately almost none of local fly shop dealers sell traditional tying materials like hooks, silk cords etc..
So, would it be possible to put materials in small info box in future fly videos / tutorials?
That would help me (us) to check what we have and what we need to order/purchase so one could try to tie own kebaris.
That’s a great idea! Thank you.
The good thing about traditional kebari is that they were originally made with pretty much ‘scavenged’ materials. The first hooks were heated and bent sewing needles (which you can still do with a little patience).
For this pattern, the silk cord is actually bought from craft/hobby suppliers and used in ‘beading’ a craft of threading beads onto silk cord to make jewellery. You can order it online. Google ‘silk beading cord’ for your nearest supplier.
For hooks, you can either cut the eye off a suitable shape eyed hook (!!!) or, in the UK, the coarse fishing tackle trade sell a lot of what are called ‘spade end’ hooks. Ironically, these are often Japanese bait fishing hooks that are renamed and repackaged for the British market.
Because bait fishing in the UK is much more popular than fly fishing, you can find an amazing range of hook shapes and sizes.
For this pattern, look for sizes 14 to 10 and as a starting point for suitable shapes and wire gauges, Gamakatsu (great Japanese brand!) sell a LOT of hooks to the British, spade end bait fishing market.
The tying thread, hackle and peacock herl are all standard fly tying supplies, so even your local shops should have them:)
Paul
Niceely tied JP. I have 1 question and 2 tips: Is there an advantage to the loop eye – like being a “hot spot” perhaps – over just tying with a normal hook? When I tie in peacock herl, Wendy Gibson taught me to start with the thread and herl at the rear, then wind the herl in front of teh thread then at the back of the thread, then from and back again etc and so on all the way to where your bidy finshes – same effect as tying through like you did but perhaps less intrusive. Second tip comes courtesy of Stuart Crofts…who uses a small piece of appropriate diameter plastic tube left on the cecramic tube of the bobbin holder (I use a 1cm length cut from tube fly plastic tubing), which you slide up and over the eye to push your hackles back, leave it in place, whip finish, then slide it back down and onto your bobbin holder. Works for me!
Tight lines,
Iain
I have order some silk beading cord, but when ordering I realised there was a large selection of thicknesses. I have ordered the smallest I can get which is 0.5 mm but is there any particular size you use?